
Hi guys, I’m back after a loooonnng break from the blog. I’m sitting here on self-quarantine during the coronavirus pandemic of 2020 and thought, dang, I’d like to get the Maker Daddy blog up and running again. So, here I am.
It’s been so long since I’ve played with the Arduino, I went out and started watching some YouTube videos to get me going. So far, my favorite tutorial series is by Paul McWhorter with Top Tech Boy. His YouTube channel is in his name and the Arduino tutorial series is at New Arduino Tutorials .
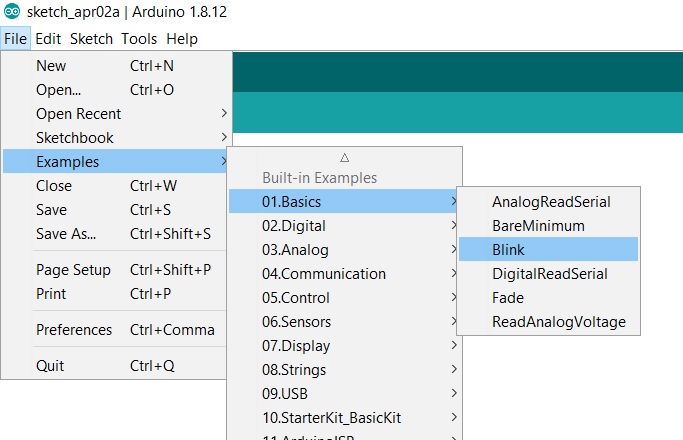
Today I’m simply going to reproduce the Blink example the Paul goes over in his tutorial #1. This example is found in your Arduino IDE (Integrated Development Environment, where you write and run sketches) under File > Examples > 01.Basics > Blink.
When you open the sketch (program) there will be a link to the tutorial on the official Arduino website, Blink.
The code is fairly simple to understand.
// the setup function runs once when you press reset or power the board
void setup() {
// initialize digital pin LED_BUILTIN as an output.
pinMode(LED_BUILTIN, OUTPUT);
}
// the loop function runs over and over again forever
void loop() {
digitalWrite(LED_BUILTIN, HIGH); // turn the LED on (HIGH is the voltage level)
delay(1000); // wait for a second
digitalWrite(LED_BUILTIN, LOW); // turn the LED off by making the voltage LOW
delay(1000); // wait for a second
}
void setup() is the function that runs when the program starts. It runs once and is typically used to set up operations that will be needed in the loop function. In this case, we are setting a pin mode. So pinMode(
LED_BUILTIN , OUTPUT) tells Arduino that we will be using the digital input pin that is used for the built-in LED and we will be sending an output signal to it. On my Uno board, the built-in LED pin is 13. Yours may differ but if you’re curious, the Arduino Blink tutorial link above lists which pin is used for which board for LED_BUILTIN.
void loop() is the function where the core of your code will live. This will run continuously,r ch over and over, operating your awesome code until the end of time or you kill it, whichever comes first. In the code for Blink, we send a HIGH signal for 1 second and then a LOW signal for 1 second. Obvious, huh? Maybe not for everyone so let’s take a closer peek at this function.
digitalWrite(LED_BUILTIN, HIGH); // turn the LED on (HIGH is the voltage level)
As the comment (the text after // above) states, we are sending a HIGH signal to the built-in LED. digitalWrite is a function given to us by Arduino that simply lets you send a HIGH or LOW signal to the specified digital pin. You might think of it as flipping a light switch on (HIGH) or off (LOW).
Now, if we left it like that, the LED would come on and stay on. Not very exciting for us die-hard programmers, right? So, let’s give it a little time to light up the board and then turn it off. The delay(1000) command takes a parameter value that is in milliseconds. 1000 is the parameter, which means that we’re sending 1000 milliseconds to the delay function. Using my advanced math skills I can tell you that 1000 divided by 1000 = 1. So 1000 milliseconds equals one second. With that reasoning, 500 milliseconds equals one half of a second. Cool, huh?
Alright, we’ve turned the LED on for one second. The next two lines turn it off for one second.
digitalWrite(LED_BUILTIN, LOW);
delay(1000);
We call digitalWrite again, this time sending a LOW signal to the LED (light switch off). After that we call delay again, keeping the LED off for another second. Guess what happens after that? Right, since we’re in the loop() function, we start all over again. On for a second, then off for a second, on and on and on.
Go ahead and deploy the code to your Arduino and enjoy the light show. Okay, not really mesmerizing, but we’re just getting started! Play around with it by changing 1000 in each digitalWrite function to another number. Make the number bigger and get a longer delay. Make the number smaller and get a shorter delay.
Next Lesson: Arduino Lesson 2 – Blink Some More