
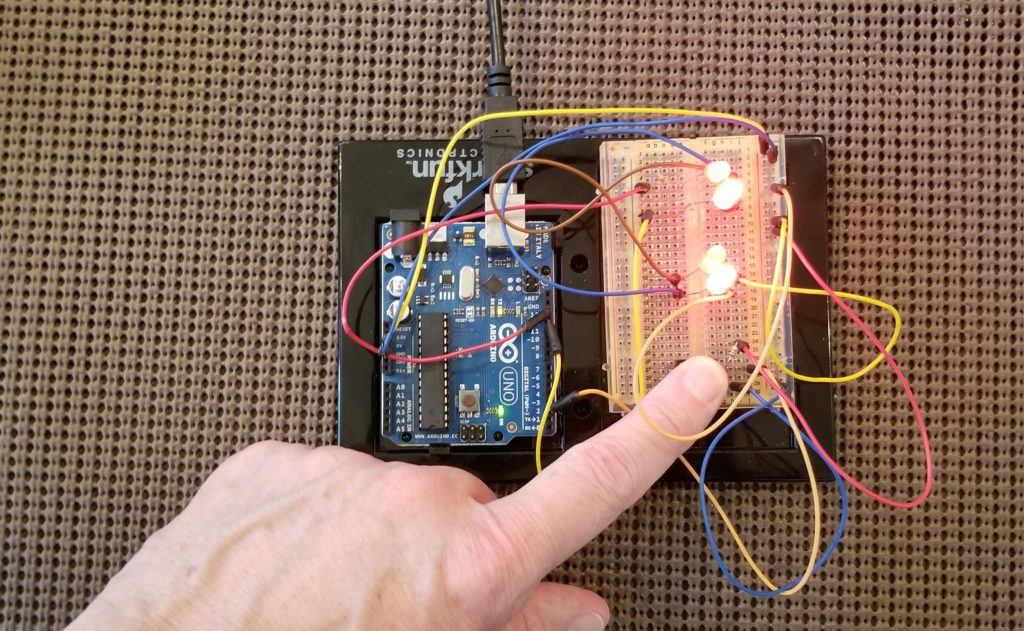
In this lesson, we will create a simple build using a pushbutton and 4 LEDs. I’ve got an idea for a project that would simulate a railroad crossing with a flashing signal, a buzzer for the siren, and a crossbar that lowers and raises with the press of a button. This article will go through the first phase of the project, setting up the LEDs and the pushbutton. The next lesson will discuss how to get the LEDs and the servo motor to operate smoothly at the same time rather than having delays.
The basic button tutorial from Arduino is here. My only changes for this lesson were to use 4 external LEDs, two per resistor, and I made a change to the wiring of the pushbutton itself. With the wiring diagram given in the tutorial, I had an issue in which the LEDs would randomly blink even without pressing the button. I found a video from HackTheWorld (see Resources below) which solved that problem.
Here is the code and a brief explanation.
/*
 arduino_lesson_5
 MakerDaddy.com

 */
 const int leftLeds = 13;
 const int rightLeds = 12;
 const int buttonPin = 2;
 const int offPeriod = 500;
 const int onPeriod = 500;
 int buttonState = LOW;
 void setup() {
   Serial.begin(9600);
   pinMode(leftLeds, OUTPUT);
   pinMode(rightLeds, OUTPUT);
   // initialize the pushbutton pin as an input:
   pinMode(buttonPin, INPUT);
 }
 void loop() {
   // read the state of the pushbutton value:
   buttonState = digitalRead(buttonPin);
 // check if the pushbutton is pressed. If it is, the buttonState is HIGH:
   if (buttonState == HIGH) {
     Serial.println("HIGH *");
     // turn LEDs on:
     blinkLight(leftLeds, onPeriod, offPeriod);
     blinkLight(rightLeds, onPeriod, offPeriod);
   } else {
     // turn LED off:
     lightsOut(leftLeds);
     lightsOut(rightLeds);
   }
 }
 void blinkLight(int pin, int delayOn, int delayOff){
    digitalWrite(pin, HIGH);
    delay(delayOn);
    digitalWrite(pin, LOW);
    delay(delayOff);
 }
 void lightsOut(int pin){
   digitalWrite(pin, LOW);
 }
First, we declare a number of constants such as “const int leftLeds = 13;” When a variable is declared as const, that means that while the program is running, it cannot be changed by the program. We did not declare the variable buttonState to be constant (const) as we will be changing the value while the program runs by pressing and releasing the button. However, we don’t want the digital pins to change while the program runs, and in order to make absolutely, positively sure of that, we’re declaring them to be constants.
Note that the buttonState is initialized as LOW. The button has two states, pressed and not pressed. Pressed equates to a HIGH signal and unpressed equates to a LOW signal.
In setup() we set the pinMode for the left LEDs and right LEDs to be OUTPUT and we set the pinMode for the push button to be INPUT. That means that our Arduino will be reading the signal coming in rather than sending a signal out.
In the loop() function we first check the value of the push button signal. As we initialized it to LOW in our global variable declaration, it is LOW the first time it’s read. Our “if” statement checks the value of buttonState. If it’s HIGH, meaning that the button is pressed, then we run the code in the if statement. Otherwise, if the signal is LOW, meaning that the button is NOT pressed, we run the code in the “else” statement.
Okay, so when we press the button, we write out to the Serial Monitor a simple statement to indicate that the button was pressed. Then we call blinkLight(leftLeds, onPeriod, offPeriod); This calls the blinkLight function with the parameters of pin, on delay, and off delay. So we first pass the leftLeds pin, 13, and the delay periods, both of which are 500 milliseconds. The blinkLight method will turn on both LEDs for a half-second and then turn them off for a half-second. Then we do the same for the right LEDs.
As long as the button is pushed, the code will continue to blink first the left and then the right LEDs. When we release the button, the signal is now LOW again, and we run the code in the “else” statement again. This calls the lightsOut function which takes a single argument, the pin number. The code in lightsOut simply sets the LED to LOW, turning it off. We call this for both the left and right LEDs.
While this code works fine for the lesson, it’s just the first step in creating the Railroad Crossing project. In order to create the project, we need to change some things. First, we want to change the code of the button such that it acts as a toggle switch. That means that when you press it you can let it go and the LEDs will continue to flash until you press the button again to turn them off. Also, as we are planning to implement a servo motor into the project I will want to operate that independently from the LEDs. That means that I will need to stop using the delay() statement in order to wait for the light to be on for 500 milliseconds and then again to have it off for 500 milliseconds.
Resources
Hack the World push button video
Previous Lesson: Arduino Lesson 4 – Analog Write and Serial Plotter
Next Lesson: Arduino Lesson 6 – Using Time to Blink, not Delay