
In this lesson, we will build upon what we’ve already done by adding a servomotor. Remember, my goal was to simulate a railroad crossing by having two flashing LEDs for the signpost, two LEDs for the crossbar that drops down across the road, and the bar itself to lower and raise. The trigger for these events is a pushbutton. What I want to happen is to press the button once, and have the lights start to flash and the crossbar to start lowering. Pressing the button again while the crossbar is in motion should not cause everything to stop. Instead, I want the crossbar to completely lower and have the LEDs continue to flash until the button is pressed again, while the crossbar is down. Then, the crossbar will raise up to its full, upright position, and then the lights will stop flashing. Pressing the button again will start the process all over again.
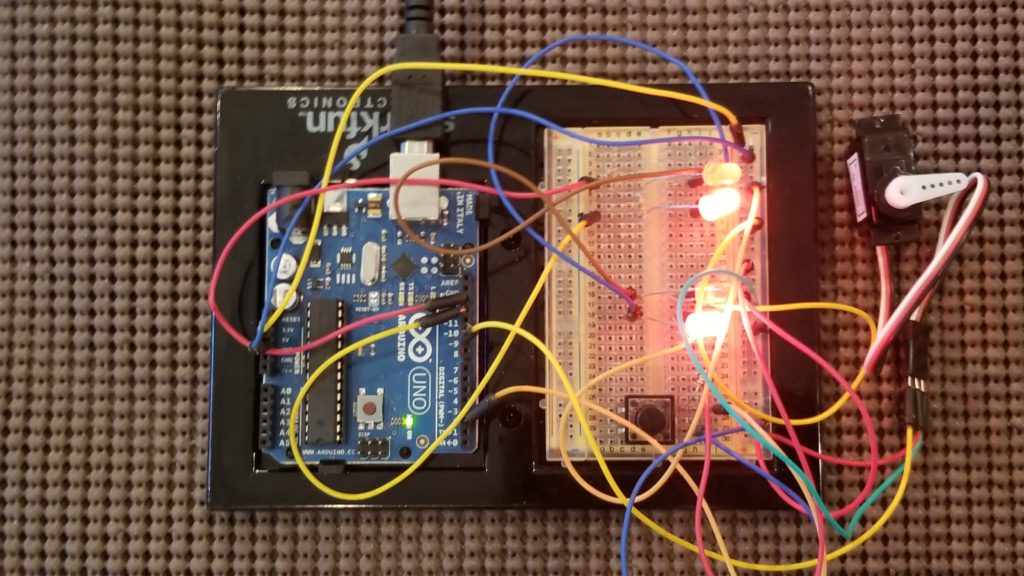
As of Lesson 7, we had the button working as a toggle switch and we’ve debounced it. The LEDs flash the way we want them to, so the only thing we need to do is add the servomotor to lower and raise the crossbar. In addition, we need to alter our logic for the button. Before, when we pressed the button, we started the lights flashing. Then, when we pressed the button again, the lights stopped flashing. Now we want the button to start a process that involves flashing the lights and lowering the crossbar. However, if we press the button again, we don’t want the lights to stop flashing until the crossbar is all the way up. Let’s take a look at the code. There will be a link to the code in the Resources section below.
/*
 arduino_lesson_8
 MakerDaddy.com
 Arduino Servo Sweep : http://www.arduino.cc/en/Tutorial/Sweep
 */
 #include <Servo.h>

 const int leftLeds = 13;
 const int rightLeds = 12;
 const int buttonPin = 2;
 const int servoPin = 9;
 int oldButtonState = HIGH;
 int currentState = LOW;
 // the previous flickerable state from the input pin
 int lastFlickerableState = LOW;
 bool running = false;
 int leftLEDState = LOW;
 int rightLEDState = LOW;
 bool leftOn = true;
 bool rightOn = false;
 // Generally, you should use "unsigned long" for variables that hold time
 // The value will quickly become too large for an int to store
 // will store last time left LEDs were updated
 unsigned long leftPreviousMillis = 0;
 // will store last time right LEDs were updated
 unsigned long rightPreviousMillis = 0;
 // will store current millis
 unsigned long currentMillis = 0;
 // interval at which to blink (milliseconds)
 const long interval = 500;
 // the last time the output pin was toggled
 unsigned long lastDebounceTime = 0;
 // the debounce time; increase if the output flickers
 unsigned long debounceDelay = 50;
 // create servo object to control a servo
 Servo myservo;
 // variable to store the servo position
 int pos = 55;
 int crossbarUpPos = 55;
 int crossbarDownPos = 180;
 int servoDelay = 20;
 unsigned long servoMillis = 0;
 bool crossbarIsUp = true;
 bool crossbarIsDown = false;
 bool servoRunning = false;
 void setup() {
   pinMode(leftLeds, OUTPUT);
   pinMode(rightLeds, OUTPUT);
   // initialize the pushbutton pin as an input
   pinMode(buttonPin, INPUT);
   Serial.begin(9600);
   // attaches the servo on pin 9 to the servo object
   myservo.attach(servoPin);
   myservo.write(crossbarUpPos);
 }
 void loop() {
   // read the state of the pushbutton value:
   currentState = digitalRead(buttonPin);
 // check to see if you just pressed the button
   // (i.e. the input went from LOW to HIGH), and you've waited long enough
   // since the last press to ignore any noise:
   // If the switch/button changed, due to noise or pressing:
   if (currentState != lastFlickerableState) {
     // reset the debouncing timer
     lastDebounceTime = millis();
     // save the the last flickerable state
     lastFlickerableState = currentState;
   }
 if((millis() - lastDebounceTime) > debounceDelay){
     // whatever the reading is at, it's been there for longer than the debounce
     // delay, so take it as the actual current state:
     // if the button state has changed:
     if(oldButtonState == LOW && currentState == HIGH){
       if(running == false && crossbarIsUp == true){
         running = true;
       }
   if(servoRunning == false){     servoRunning = true;   } } // save the the last steady state oldButtonState = currentState;
 }
 if(running){
     runProcess();
   }else{
     if(crossbarIsUp == true){
       stopProcess();
     }
   }
 }
 void runProcess(){
     currentMillis = millis();
     // check to see if it's time to blink the LED; that is, if the difference
     // between the current time and last time you blinked the LED is bigger than
     // the interval at which you want to blink the LED.
     if(currentMillis - leftPreviousMillis >= interval && leftOn){
       leftPreviousMillis = currentMillis;
       // if the LED is off turn it on and vice-versa:
       if (leftLEDState == LOW) {
         leftLEDState = HIGH;
       } else {
         leftLEDState = LOW;
         leftOn = false;
         rightOn = true;
       }
       writeLED(leftLeds, leftLEDState);
     }
 if(currentMillis - rightPreviousMillis >= interval && rightOn){   rightPreviousMillis = currentMillis;   // if the LED is off turn it on and vice-versa   if (rightLEDState == LOW) {     rightLEDState = HIGH;   } else {     rightLEDState = LOW;     leftOn = true;     rightOn = false;         }      writeLED(rightLeds, rightLEDState); } // servo if(currentMillis - servoMillis >= servoDelay && servoRunning){     servoMillis = currentMillis;     if(crossbarIsUp == true){       pos++;       if(pos <= crossbarDownPos){         myservo.write(pos);       }else{         crossbarIsDown = true;         crossbarIsUp = false;         servoRunning = false;               }     }else{       pos--;       if(pos >= crossbarUpPos){         myservo.write(pos);       }else{         crossbarIsDown = false;         crossbarIsUp = true;         running = false;          servoRunning = false;                  }               } }
 }
 void stopProcess(){
   writeLED(leftLeds, LOW);
   writeLED(rightLeds, LOW);
   leftOn = true;
   rightOn = false;
   leftPreviousMillis = 0;
   rightPreviousMillis = 0;
   leftLEDState = LOW;
   rightLEDState = LOW;
   servoRunning = false;
 }
 void writeLED(int pin, int state){
    digitalWrite(pin, state);
 }
We have added const int servoPin = 9; This constant sets the digital pin to which we will write the position to which we want the servomotor to rotate. Servo myservo; creates an object to represent our servomotor. int pos = 55; is the initial position we want our servomotor to rotate to. In my case, I played around and determined that 55 is the position where the horn (plastic piece attached to the shaft) of my servo is pointing straight up. This will vary depending on what position it is in when you attach the horn to the servomotor. const int crossbarUpPos = 55 is the same value but is a constant because we will use this to determine if the servomotor is fully upright. const int crossbarDownPos = 180 represents the constant value for when the crossbar is fully in the down position. const int servoDelay = 20 is a delay we’ve put in so the crossbar lowers slowly. The smaller the value for this, the faster the servomotor will rotate, and the faster the crossbar will lower. Just as we need to track time in milliseconds to control the delay in flashing the LEDs, we need to do the same with the servomotor. unsigned long servoMillis = 0 is used to determine if enough time has passed (servoDelay) to rotate the servomotor to the next position. bool crossbarIsUp = true sets the initial value to true as we are starting with the crossbar at the fully upright position. We will check this value later to determine if we can stop the process after the button has been pressed. bool crossbarIsDown = false. We will check this later to determine if we can listen for button presses again. bool servoRunning = false. We will use this to determine if the servomotor should be rotating the crossbar up or down.
In setup() we attach the digital pin to the servo using myservo.attach(servoPin). Then we call myservo.write(crossbarUpPos) to rotate the servo such that the crossbar starts in the upright position. The write command takes a parameter that is the value of the position of the servomotor. It typically is going to be in a range of 0 – 180.
In the loop() function I’ve made a change in the code that detects a button press. if(running == false && crossbarIsUp == true). Here we are checking to start the process by switching the running variable to true. We only want to do that if running is currently false and the crossbar is up.
Next, we check to see if servoRunning is false. If so, we set it to true. This will be used later to determine if we should rotate the servomotor shaft. If running is true, we start the process. If running is false and the crossbar is up, we can stop the process and reset our variables for the next time the button is pressed. Remember, we don’t want to stop the lights or servomotor until the crossbar is pointing back up.
In the runProcess() method, the code that controls the LEDs remains the same. We have added code to check the last time the servomotor was rotated. We do that by checking the currentMillis variable against the new variable, servoMillis. If there has been sufficient time, represented by the servoDelay value, and servoRunning is true, reset the value of servoMillis to currentMillis. Then we check the value of crossbarIsUp to determine if we are raising or lowering the crossbar during the process. If it is true, we are lowering the crossbar by increasing the value of pos for each loop. Once the value is greater than or equal to our constant, crossbarDownPos, we can stop rotating the shaft. At this point we want to set crossbarIsDown to true, crossbarIsUp to false and servoRunning to false. We set servoRunning to false so that the code in the if statement is no longer called.
If crossbarIsUp is false, we will instead run code to raise the crossbar. We use pos– to lower the value from our max value when the crossbar is down, to the lower value that represents the crossbar being all the way up. Once the crossbar is fully in the upright position, determined by comparing the current position to the value of crossbarUpPos, we reset variables crossbarIsDown, crossbarIsUp, running, and servoRunning. The key to note here is that we are setting the value of running to false. The code in our loop function will note that we have finished our process, the crossbar is fully up, and running is false. That is when we call stopProcess() to turn the LEDs off and reset the variables needed when we start the process over again.
Resources
Previous Lesson: Arduino Lesson 7 – Debounce the Button and Operate as Toggle Switch